
pfSense OpenVPN client, gateway, NAT and firewall rules

Hosting your own Mail Server
Company: Personal Project
Part 2 of 2 — In this part we configure pfSense as the OpenVPN client, create the gateway, set up outbound NAT, and add the necessary firewall rules so that all traffic arriving on the Linode VPS is correctly forwarded to Mailcow.
Architecture Recap
Internet
   │
   ▼
┌──────────────────────────────┐
│  Linode VPS (Debian 12)      │
│  • OpenVPN Server (UDP 1100) │
│  • UFW + DNAT rules          │
│  • Forwards almost all       │
│    traffic to VPN client     │
└──────────────┬───────────────┘
               │ OpenVPN tunnel
               ▼
┌──────────────────────────────┐
│  pfSense (OpenVPN Client)    │
│  • Receives all forwarded    │
│    ports via the tunnel      │
│  • Protects Mailcow          │
└──────────────┬───────────────┘
               │
               ▼
┌──────────────────────────────┐
│  Mailcow (internal network)  │
└──────────────────────────────┘
1. Import the OpenVPN Client Configuration
- Go to VPN → OpenVPN → Clients
- Click Add
- Set the following key options:
- Server Mode: Peer to Peer (SSL/TLS)
- Protocol: UDP on IPv4 only
- Device mode: tun
- Interface: WAN
- Server host or address: Your Linode public IP
- Server port: 1100
- Description: Linode-VPN
- Under Cryptographic Settings:
- Paste the CA, Certificate, and Private Key from the
pfsense-client.ovpnfile - Set TLS Key → enable and paste the
tls-cryptkey - TLS Key Usage Mode: TLS Crypt
- Data ciphers:
AES-256-GCM - Auth digest algorithm:
SHA256
- Paste the CA, Certificate, and Private Key from the
- Save and apply changes.
Once the client connects successfully you should see it under Status → OpenVPN with a green “up” status.
2. Assign the OpenVPN Interface & Create Gateway
- Go to Interfaces → Assignments
- Add the new OpenVPN interface (it will appear as
ovpnc1or similar) - Enable the interface and give it a name, for example: LINODE_VPN
- Set IPv4 Configuration Type to None (the IP is assigned by OpenVPN)
- Save and Apply
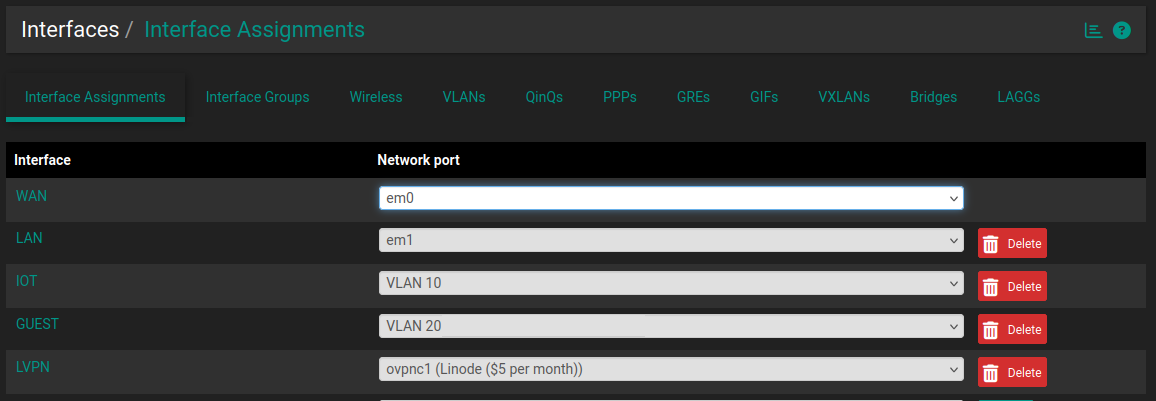
Now create the gateway:
- Go to System → Routing → Gateways
- You should see a dynamic gateway created automatically (e.g.
LINODE_VPN_VPNV4) - Edit it and set:
- Name: LINODE_VPN_GW
- Interface: LINODE_VPN
- Gateway: (leave dynamic or use the tunnel IP of the VPS if needed)
- Enable Default Gateway only if you want all traffic to go through the Linode VPS (usually not recommended for Mailcow)
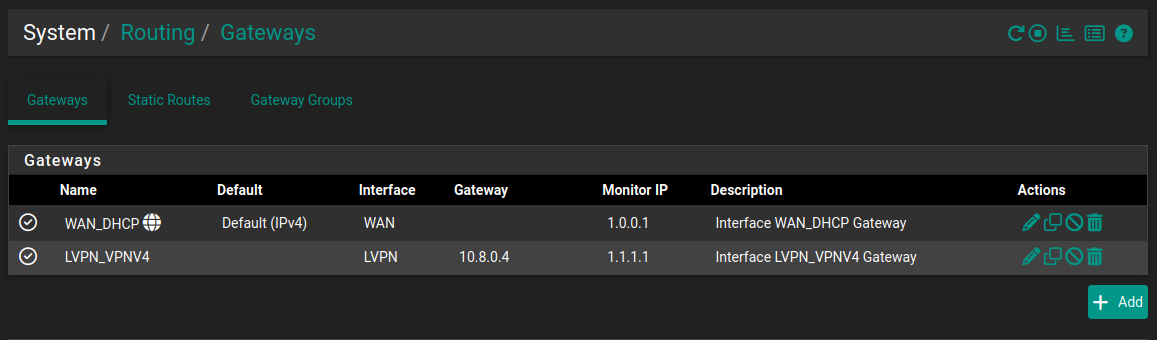
Recommendation: Do not make this the system default gateway. We will use policy-based routing / selective outbound NAT instead.
3. Outbound NAT Configuration (Hybrid or Manual)
For this setup we recommend Hybrid Outbound NAT so we can add specific rules while keeping the automatic ones.
- Go to Firewall → NAT → Outbound
- Select Hybrid Outbound NAT rule generation
- Click Save
- Add a new mapping with these settings:
| Setting | Value |
|---|---|
| Interface | LINODE_VPN |
| Address Family | IPv4 |
| Source | Mail server IP |
| Destination | Any |
| Translation / Target | Interface Address |
| Description | Mailcow / LAN → Linode VPN |
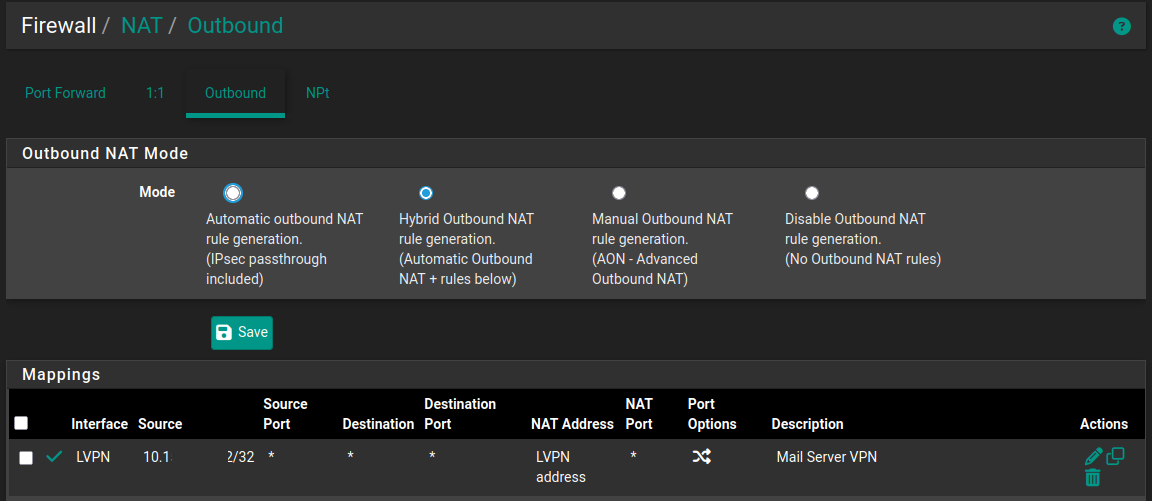
This ensures traffic from your internal network (Mailcow) leaves via the OpenVPN tunnel when required.
4. Required Ports for Mailcow
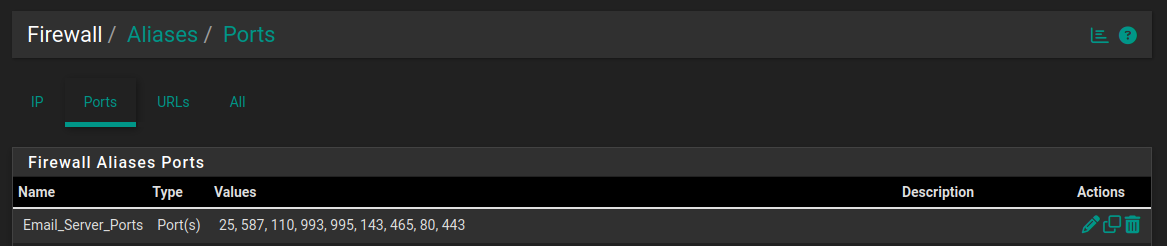
These are the ports Mailcow typically needs. Because the Linode VPS is already DNATing almost everything, you mainly need to allow them on pfSense.
- 25/tcp – SMTP
- 465/tcp – SMTPS
- 587/tcp – Submission
- 110/tcp – POP3
- 995/tcp – POP3S
- 143/tcp – IMAP
- 993/tcp – IMAPS
- 80/tcp + 443/tcp – HTTP/HTTPS (SoGo, Admin UI, ACME)
- 4190/tcp – ManageSieve (optional)
5. Firewall Rules
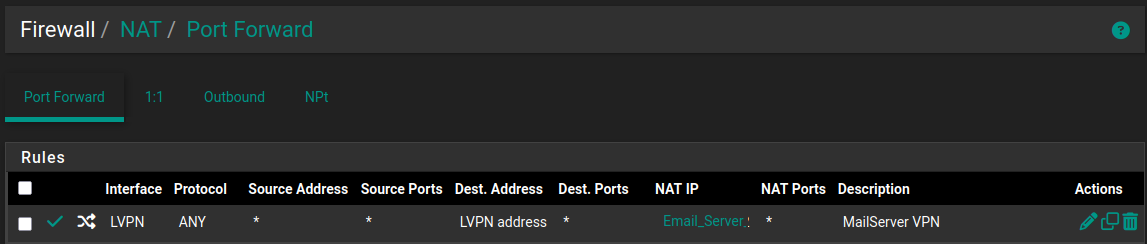
5.1 port Forward Rule on the LINODE_VPN Interface
Allow traffic coming from the Linode VPS (the tunnel) to reach your internal services:
- Go to Firewall → Rules → LINODE_VPN
- Add a rule:
- Action: Pass
- Interface: LINODE_VPN
- Source: Any (or restrict to the VPS tunnel IP)
- Destination: LAN net (or Mailcow IP)
- Destination Port: The Mailcow ports listed above in an alias (or “Any” for simplicity during testing)
- Description: Allow from Linode VPN
5.2 LAN Rule
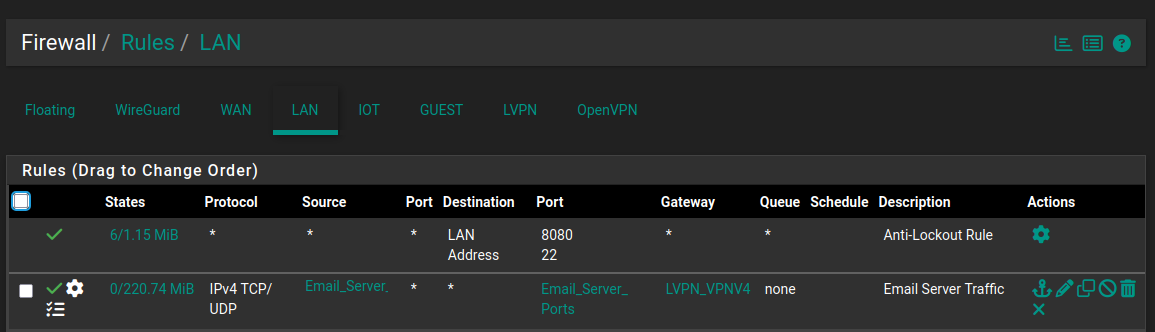
If you want internal clients to reach the internet via the normal WAN and only specific traffic via the VPN, create a normal LAN allow rule. No special change is required here for basic operation.
6. Final Checks
- Confirm the OpenVPN client shows as up under Status → OpenVPN
- Check that the LINODE_VPN interface has an IP in the 10.8.0.0/24 range
- From an external network, test SMTP (port 25), HTTPS (443), etc.
- Watch the logs: Status → System Logs → Firewall and OpenVPN
Summary
At this point you should have:
- OpenVPN client connected to the Linode VPS
- A dedicated gateway for the tunnel
- Hybrid Outbound NAT so internal traffic can leave via the VPN when needed
- Firewall rules allowing the forwarded traffic to reach Mailcow
Your Mailcow instance is now reachable from the internet while remaining completely behind pfSense — no public IP required on the mail server itself.
This concludes the two-part series. You can now harden the rules further, add monitoring, and put proper TLS certificates on Mailcow.
You should also read:

Automated Print Cost Recovery & Client Billing Integration
Print-to-Profit Solution
Company: Gold Business Technologies Ltd.
In professional services environments (particularly legal and consulting firms), printing, copying, and scanning costs represent a significant expense. Recovering these costs from clients—by accurately allocating usage to specific matters, clients, or departments—was historically manual, inconsistent, and prone to under-billing or disputes.
Continue reading...
Moneris Payment Gateway Integration for Online Invoice Payment
Drupal-Based Solution
Company: Gold Business Technologies Ltd.
Customers increasingly requested secure, non-PayPal options for paying invoices online. To meet this demand, the company selected Moneris as the payment processor. However, integrating Moneris into the existing infrastructure presented significant technical challenges due to an outdated website and legacy systems.
Continue reading...
Lottery Terminal Field Update & Rescue Toolkit
Custom Live Linux Distribution
Company: NCR Canada Ltd.
In the era before widespread high-speed internet, updating lottery terminal firmware or gaming software was extremely inefficient. Terminals used slow 1200 baud modem connections (often taking days for transfers), and the alternative—shipping specialized USB jump drives with EXT filesystem images—was costly, logistically complex, and incompatible with standard Windows systems.
Continue reading...